I keep trying to get this recipe right and I think this time I got it! This is not a recipe for a beginner cook. I do not give amounts because you need to work with how much chicken you have and I do not measure seasonings when I add them. So you need to use your cooking experience to estimate the amount of onion and pepper and seasonings etc. My main trick was to use a lot of seasoning in everything that went into it and using many different rich flavors. And of course everything made with bacon fat is going to be yummy!!!
Guten Appetit!
Ingredients:
Tortillas, (I use sprouted wheat ones)
Cooked chicken, (I use what I have from my broth chicken, usually tender and shredded)
Refried beans, one can
Black beans, one can
Shredded Cheese
Enchilada Sauce (I make red one myself)
Bacon fat
Onions
Green Pepper
Method:
1.In a cast iron pan in plenty of bacon fat sautee your sliced onion and green peppers until soft but not limp. Season with some salt and chili powder. Set aside.
2.In same pan add a little more fat and add cooked chicken and black beans, season well with salt, onion powder and chili powder or whatever your favorite seasoning is. Just heat through on medium heat. Don't fry. Take off heat.
3. Get ready to assemble your burritos. Put a tortilla on a plate and line up all your ingredients. Layer them as follows: Spread refried beans on the middle of tortilla, add chicken mixture, spread onions and peppers, sprinkle with cheese and drizzle a little sauce. Roll them up and place upside down in a 9x13 pan that has a little of the sauce in the bottom.
4. Do this with the rest of your tortillas and then pour sauce over the top of them and sprinkle with more cheese. Cover with foil and put in 350 oven until heated through, about 30-40 minutes. Check to make sure sauce is bubbly but not burning.
Friday, July 12, 2013

Friday, April 26, 2013
Brown Rice Pudding
2 cups uncooked, soaked brown rice
3 eggs
1 1/2 c. heavy cream
1/3 cup maple syrup
1 tsp. vanilla extract
1/8 tsp sea salt
1 tsp cinnamon
1-2 cups of raisins
Cook brown rice. Beat eggs. Add cream, syrup, vanilla, salt and cinnamon to eggs. Put cooked brown rice into a large baking dish. Pour egg mixture over it and stir. Add raisins. Bake for 50-60 minutes @350 degrees or until set and brown.
Tip:
I always cook the brown rice the day before. I might be making it for dinner and I will just make extra. The amount of rice does not need to be exact. Then in the evening I throw this together and just put it in the oven in the morning. It takes so long to bake that is helps to have it all ready to go in the oven in the morning. When it sits overnight the raisins plump up real nicely and taste like grapes!!
3 eggs
1 1/2 c. heavy cream
1/3 cup maple syrup
1 tsp. vanilla extract
1/8 tsp sea salt
1 tsp cinnamon
1-2 cups of raisins
Cook brown rice. Beat eggs. Add cream, syrup, vanilla, salt and cinnamon to eggs. Put cooked brown rice into a large baking dish. Pour egg mixture over it and stir. Add raisins. Bake for 50-60 minutes @350 degrees or until set and brown.
Tip:
I always cook the brown rice the day before. I might be making it for dinner and I will just make extra. The amount of rice does not need to be exact. Then in the evening I throw this together and just put it in the oven in the morning. It takes so long to bake that is helps to have it all ready to go in the oven in the morning. When it sits overnight the raisins plump up real nicely and taste like grapes!!
Saturday, February 2, 2013
Dilly Salmon Dip/Spread
3.75 oz can of water-packed salmon, drained and flaked
3 oz cream cheese ( I think I used half a regular one, so maybe 4oz.)
Mayonnaise (didn't measure, use enough to get to desired consistency)
1 tsp. dried dill weed
Worchestershire (maybe a 1/4 -1/2 tsp.)
1 tsp. Vinegar
1/4 tsp. salt
Fresh ground pepper
1/2 tsp pickle juice
Lemon juice (maybe 1/2 tsp.)
Blend it all up and refrigerate. Really can't go wrong with this. Add your favorite flavors.
3 oz cream cheese ( I think I used half a regular one, so maybe 4oz.)
Mayonnaise (didn't measure, use enough to get to desired consistency)
1 tsp. dried dill weed
Worchestershire (maybe a 1/4 -1/2 tsp.)
1 tsp. Vinegar
1/4 tsp. salt
Fresh ground pepper
1/2 tsp pickle juice
Lemon juice (maybe 1/2 tsp.)
Blend it all up and refrigerate. Really can't go wrong with this. Add your favorite flavors.
Thursday, January 24, 2013
Nut crunch chocolate PB bars
I just came up with these and they are out of this world!!

1/2 cup Peanut Butter
1/4 cup raw honey
1/3 cup coconut oil
1/2 cup chocolate chips
1/2 tsp vanilla
1 1/4 nuts of your choice
1/4 cup coconut chips, unsweetened (optional)
In a medium saucepan melt peanut butter, coconut oil and chocolate chips on medium low heat. Stir often. Add honey just til blended in well. Turn off heat and add vanilla. Combine nuts and coconut in a metal or glass bowl. Pour chocolate mix over nuts. Spoon into mini-muffin cup pan. (Fills one pan.)
Place in freezer for a few hours.
They easily pop out of the cups just by gently pushing a knife down on one side. There is no sticking at all. They come out clean. If you don't have a mini-muffin pan, you could use a normal muffin pan and then chop them into pieces. You could also put this into a square pan and then just cut them into bars I bet. I just love the way they look coming out of the mini-muffin tins. Sorry no photo yet!
They are so rich and delicious and you can use any kind of nuts you like. They do need to store in the freezer or fridge or they will get to melty and oily.
1/2 cup Peanut Butter
1/4 cup raw honey
1/3 cup coconut oil
1/2 cup chocolate chips
1/2 tsp vanilla
1 1/4 nuts of your choice
1/4 cup coconut chips, unsweetened (optional)
In a medium saucepan melt peanut butter, coconut oil and chocolate chips on medium low heat. Stir often. Add honey just til blended in well. Turn off heat and add vanilla. Combine nuts and coconut in a metal or glass bowl. Pour chocolate mix over nuts. Spoon into mini-muffin cup pan. (Fills one pan.)
Place in freezer for a few hours.
They easily pop out of the cups just by gently pushing a knife down on one side. There is no sticking at all. They come out clean. If you don't have a mini-muffin pan, you could use a normal muffin pan and then chop them into pieces. You could also put this into a square pan and then just cut them into bars I bet. I just love the way they look coming out of the mini-muffin tins. Sorry no photo yet!
They are so rich and delicious and you can use any kind of nuts you like. They do need to store in the freezer or fridge or they will get to melty and oily.
Tuesday, November 13, 2012
Chicken Liver Pate
Ingredients:
3 Tbsp. butter, plus 4 Tbsp, softened
1 pound chicken or duck livers
1/2 pound mushrooms, coarsely chopped
1 bunch scallions, white and green parts, coarsely chopped
2/3 cup dry white wine or vermouth
1 med. garlic clove, mashed
1/2 tsp. powdered mustard
1/4 tsp. dried dill
1/4 tsp. dried rosemary
1 Tbsp. freshly squeezed lemon juice
Sea salt
Melt the 3 Tbsp. butter in a large heavy skilled over medium heat. Add the livers, mushrooms and scallions, cook for about 10 minutes, stirring occasionally, until the livers are browned. Add the wine, garlic, powdered mustard, herbs and lemon juice. Increase the heat to medium-high, bring to a boil and cook, uncovered, for 8 to 10 minutes until the liquid is gone. Transfer to the bowl of a food processor and allow to cool.
When completely cooled, add the 4 Tbsp. if softened butter. Process until smooth, then taste and season with salt as needed. Transfer to a crock or mold, cover and refrigerate for at least 30 minutes and up to 1 week.
This is a version of the recipe in "Nourishing Traditions" by Sally Fallon.
3 Tbsp. butter, plus 4 Tbsp, softened
1 pound chicken or duck livers
1/2 pound mushrooms, coarsely chopped
1 bunch scallions, white and green parts, coarsely chopped
2/3 cup dry white wine or vermouth
1 med. garlic clove, mashed
1/2 tsp. powdered mustard
1/4 tsp. dried dill
1/4 tsp. dried rosemary
1 Tbsp. freshly squeezed lemon juice
Sea salt
Melt the 3 Tbsp. butter in a large heavy skilled over medium heat. Add the livers, mushrooms and scallions, cook for about 10 minutes, stirring occasionally, until the livers are browned. Add the wine, garlic, powdered mustard, herbs and lemon juice. Increase the heat to medium-high, bring to a boil and cook, uncovered, for 8 to 10 minutes until the liquid is gone. Transfer to the bowl of a food processor and allow to cool.
When completely cooled, add the 4 Tbsp. if softened butter. Process until smooth, then taste and season with salt as needed. Transfer to a crock or mold, cover and refrigerate for at least 30 minutes and up to 1 week.
This is a version of the recipe in "Nourishing Traditions" by Sally Fallon.
Monday, October 15, 2012
Coconut Flour Pancakes (gluten-free, grain-free)
This is from www.cheeseslave.com, one of my favorite blogs.
It's the same recipe minus the salt and sweetener.
3 eggs
3 Tbsp. melted butter or coconut ol
3 Tbsp. whole milk, or coconut milk
3 Tbsp. coconut flour
1/2 tsp. baking powder (optional)
Whisk together eggs, butter, milk. Add baking powder and coconut flour until well mixed.
Heat coconut oil in a skillet or on a griddle over medium low.
Spoon 2-3 Tbsp of batter onto skillet to make 3-4 inch diameter pancakes.
This makes only a small about of batter, only about 4 medium pancakes. So most of the time I double it.
I like to add mini chocolate chips or almond extract to spice them up a bit on occasion.
It's the same recipe minus the salt and sweetener.
3 eggs
3 Tbsp. melted butter or coconut ol
3 Tbsp. whole milk, or coconut milk
3 Tbsp. coconut flour
1/2 tsp. baking powder (optional)
Whisk together eggs, butter, milk. Add baking powder and coconut flour until well mixed.
Heat coconut oil in a skillet or on a griddle over medium low.
Spoon 2-3 Tbsp of batter onto skillet to make 3-4 inch diameter pancakes.
This makes only a small about of batter, only about 4 medium pancakes. So most of the time I double it.
I like to add mini chocolate chips or almond extract to spice them up a bit on occasion.
Friday, September 21, 2012
Sourdough bread - slow fermentation
After studying different ways and methods of making sourdough bread I settled on information from two main sources. I found the website www.sourdoughhome.com to be the easiest information to understand how to take care of my starter and I found the recipe at http://www.rejoiceinlife.com/recipes/sourdoughSlow.php to be the easiest recipe to follow while still providing a slow fermentation. A slow fermentation is important because in that time the gluten is partly or largely broken down as well as other anti-nutrients such as phytic acid. (Visit www.westonaprice.org for more information on how to treat your grains properly and why.)
So, here is the information I found helpful when putting together my
100% Whole Wheat Sourdough Bread.
So, here is the information I found helpful when putting together my
100% Whole Wheat Sourdough Bread.
To be ready to start the recipe
you need to have a healthy sourdough starter.
If you have a healthy starter here are the 3 rules to maintain it:
1.
It must be feed no less than twice a day to keep its
vitality (if it is at room temperature)
2.
Each feeding should be enough for it to double its size.
3.
Each feeding should be equal amouts of water and flour by
weight. (2 parts water to 3 parts flour by volume)
*****If your starter was in the
fridge you should take it out and give it at least one feeding
the night before Day 1 to make sure it’s very active.******
(This information is taken from: http://www.sourdoughhome.com/)
THE RECIPE:
- About 4 cups whole wheat flour
- ½ cup very active starter
- ¼ tsp. Sea salt
- 25 g (2 Tbsp.) lard or butter
- Water
(65 g = ½ cup of flour)
(65
g = little less than 1/3 c. water)
(The recipe is taken from: http://www.rejoiceinlife.com/recipes/sourdoughSlow.php)
Day 1 (Making the Sponge)
9:00 am (First feed)
In a large mixing bowl, mix 65 g whole wheat flour
and 65 g of water with ½ cup of your active starter. Cover the bowl and leave
in a warm place for 4-5 hours.
1:00 pm (Second feed)
Add another 65 g each of flour and water to the
bowl. Stir and cover.
4:00 pm (Third feed)
Add another 65 g each of flour and water to the
bowl. Stir and cover.
7:00 pm (final additions)
Dissolve ¼ tsp of sea salt in ½ cup of water and add
it to the sponge, then mix in the melted fat. Then add 325 g (2 ½ cups) of
flour. Add a little cold water at a time to form a wet dough. You want the
dough to just stick to your hands and countertop. The wetter the better. Knead
for about 5 minutes. Drizzle a little olive oil in a glass bowl, cover with
plastic and put into the fridge for 12-72 hours. This is the slow
fermentation step that breaks down anti-nutrients including some gluten.
Day 2 (Baking Day)
9:00 am (Rising Time)
Take dough out of fridge (It should have doubled in
size.)
Dump onto counter and let warm for a few minutes. Knead
for a few minutes, adding water if necessary.
Shape dough and put into greased baking pan (I like
pampered chef stoneware greased with coconut oil)
Cover with plastic and leave in warm place until double
in size (3 ½ to 4 hours).
1:00 pm (Baking time)
Bake at 350 for about 45 minutes. If you have a baking
stone put it in the oven as you preheat it and add a metal bowl of hot water to
the bottom of the oven.
Bread should read about 180-190 degrees inside when
done. Cool on wire rack.
Important:
“A warm place” means warmer than a normal house at
room temp. I set mine inside the oven with the light on. It is 82 in there and
that seems to work perfectly.
Wednesday, March 28, 2012
Mexican Casserole

1 lb ground beef or venison
1-2 cups brown rice
1 can black beans, drained and rinsed
1 (15 oz.) can tomato sauce
1/2 onion, diced
3 garlic cloves, minced
1 tsp. paprika
1 tsp. chili powder
1 tsp. ground cumin
1 tsp. garlic powder
1 tsp. dried oregano
salt and pepper to taste
1-2 cups shredded cheddar cheese
tomatoes
Cook rice according to instructions. Preheat oven to 350. Cook ground beef for 4 minutes then add onion and all the seasonings. Stir well and cook 10 minutes more or until beef is done and onion translucent. Add minced garlic and cook 1 min. Add rice, beans and tomato sauce. Stir and pour into buttered casserole. Layer sliced tomatoes on top and sprinkle with cheese. Serve with your favorite toppings (sour cream, salsa, guacamole.)
Tuesday, March 20, 2012
Chocolate Ice Cream
3 egg yolks (farm-fresh, local if possible)
3 cups cream (I use 1 pint heavy cream from the store (not ultra-pasteurized) and 1 cup raw)
1 Tbsp. pure vanilla (don't cheat on quality here. Makes a big difference)
1/3 cup cocoa powder processed with alkali (won't taste the same with regular cocoa powder)
3 oz. Pure Maple Syrup
Mix all together and pour into ice cream maker.
Yum!
(the quality of the cream makes a big difference on how creamy it is. You can substitute milk for cream and it will get less thick and creamy. You can buy the most expensive brand of high quality local cream for example "Black Star Dairy" in the Park Rapids area and you get a heavenly rich creamy ice cream)
P.S. For vanilla ice cream you just leave out the cocoa powder.
3 cups cream (I use 1 pint heavy cream from the store (not ultra-pasteurized) and 1 cup raw)
1 Tbsp. pure vanilla (don't cheat on quality here. Makes a big difference)
1/3 cup cocoa powder processed with alkali (won't taste the same with regular cocoa powder)
3 oz. Pure Maple Syrup
Mix all together and pour into ice cream maker.
Yum!
(the quality of the cream makes a big difference on how creamy it is. You can substitute milk for cream and it will get less thick and creamy. You can buy the most expensive brand of high quality local cream for example "Black Star Dairy" in the Park Rapids area and you get a heavenly rich creamy ice cream)
P.S. For vanilla ice cream you just leave out the cocoa powder.
Wednesday, February 8, 2012
How to cook nourishing baby food

"Third time is a charm."
It is time to start feeding my third child solids. What do I feed him?
As a Weston A. Price Foundation Chapter Leader and having just finished reading the "GAPS Syndrome" book by Natasha Campbell McBride and dealing with yet another child that seems to deal with reflux issues I am motivated and enabled more than ever to start out on the right foot. (or should I say "food"?) So I vowed to never buy a single jar (or plastic container) of baby food for this baby and I am finding out it is not that difficult and so delightful to me to go to my freezer and pull out what I want to feed him. I feel so good knowing what I am feeding him. I want to know what kind of chicken is in my baby food!
Philosophy behind this approach:
I used Natasha Campbell McBride's chapter on Introducing Solids to guide me in what to introduce first. I believe that her suggestions take into account what is most nourishing to the baby at that time in their life, hopefully having had only breastmilk up to that point. Also she focuses highly on digestibility of the food, making sure baby has enzymes and such present, to be able to digest the foods that are introduced.
That means of course that no starches (grains and starchy vegetables) are introduced since baby lacks most of the enzymes to digest starches well. (See the GAPS website for more info on the hows and why's of the diet.)
4 Steps to nourishing baby food:
1. Cook
2. Puree
3. Freeze
4. Select, mix and match
To have on hand:
1. Blender or hand blen
 der
der2. Ice cube freezer trays
3. Zip lock bags and permanent marker
Getting started
1. One of the most nourishing foods on the planet are bone broths. If you already cook broths regularly this will be an easy first step for you. If not here is my post on how to cook Basic Chicken broth.
2. So your broth will have carrots, onion and celery in it (chose home-grown, farmer's market or organic if possible) and a healthy local chicken if possible.
- To make your baby food, carefully strain out the vegetables making sure you don't have chicken bones in with them and place them in another pot (if you are using a hand blender) or in your blender. (Note: I tried using my food processor and it does not make a smooth puree that way. My hand blender did a much nicer job. It looked creamy just like out of a baby food jar. Just beautiful!)
- Over the vegetables I poured some of the broth just enough so they are sitting in it. Here you will just need to decide how thick or runny you want it to be. Start with a little less and add more broth if you want it thicker. Also remember that it thickens a little.
- Blend this up, fill into the ice cube trays and freeze until solid. Next day label your zip lock bags and pop the cubes into them.
- To use: take out one or two cubes for a meal and store in a glass container with lid such as pyrex in the fridge. To warm up, set it into a pan with a little water and heat until warm. You can feed right out of that container.

- Now that you have learned the basics you can go ahead and print out the guideline for introducing solids that you can find at the link above.
- In week three you introduce pureed meat. I recommend on the same day you made the broth and vegetable cubes to make some cubes with broth and chicken meat, cartilage and skin blended up and freeze as well as some cubes with squash and broth or cauliflower and broth, or just squash or just cauliflower. When you get to week three you can go ahead and take out two cubes per meal, one with meat and one with veggies and you can mix and match! So much fun and a little different for baby each time. I like to use cauliflower, squash, carrots and broccoli.
Monster bars
This is my final adjusted version of healthier Monster bars and they are great!
They are not healthy but the best I can do when I need to have a treat in the house, lest I succumb to even worse stuff from the store, heaven forbid!
(Notice there is no wheat in this.)
So here they are:
1/2 cup butter
2 cups rapadura (evaporated cane juice)
about 2-3 Tbps. molasses (I don't measure. Can't go too wrong here.)
Cream together. Then add:
3 eggs
1 1/2 cups peanut butter (I used Skippy natural)
1 Tbsp. vanilla
1 1/2 tsp. baking soda
2 cups quick oats
2 cups rolled oats
1 1/2 cups chocolate chips
Gently spread in greased jelly roll pad. Do not push down.
Sprinkle over top:
1 mini package mini M&M's (left over from Halloween!)
(Just enough to make it look pretty but ends up being just one per square.)
Bake at 350 for 15 minutes. Be careful not to overbake!!
Boy were my kids excited when that came out of the oven today. I have not baked anything for a long time and I was the best Mom in the world all of a sudden!
They are not healthy but the best I can do when I need to have a treat in the house, lest I succumb to even worse stuff from the store, heaven forbid!
(Notice there is no wheat in this.)
So here they are:
1/2 cup butter
2 cups rapadura (evaporated cane juice)
about 2-3 Tbps. molasses (I don't measure. Can't go too wrong here.)
Cream together. Then add:
3 eggs
1 1/2 cups peanut butter (I used Skippy natural)
1 Tbsp. vanilla
1 1/2 tsp. baking soda
2 cups quick oats
2 cups rolled oats
1 1/2 cups chocolate chips
Gently spread in greased jelly roll pad. Do not push down.
Sprinkle over top:
1 mini package mini M&M's (left over from Halloween!)
(Just enough to make it look pretty but ends up being just one per square.)
Bake at 350 for 15 minutes. Be careful not to overbake!!
Boy were my kids excited when that came out of the oven today. I have not baked anything for a long time and I was the best Mom in the world all of a sudden!
Monday, September 19, 2011
One pot chicken meal
This is a recipe we came up with on one of our camping trips. It was thrown together in a cast iron dutch oven over an open fire. And was a real winner. I am typing it in here so I don't lose the recipe.
1 med. onion, chopped
Lots of butter
Brown in the dutch oven.
Add 1 package of cut up chicken breast. Brown.
Add:
1 can tomato sauce (15 oz.)
4 cups water
1 Tbsp. onion onion seasoning (Tastefully Simple) or similar
Bring to a boil, add:
1 cup brown rice (soaked previously is preferrable)
1 tsp. salt
Shake of curry
Cook for 30 min or until rice is almost done, add:
1 can pinto beans
2-3 cups fresh green beans (optional)
It turns out to be sort of a stew and it was wonderful. The green beans were a last minute add on, you could use peas or nothing green or throw in whatever sounds good. We like to experiment.
Enjoy!
(P.S. I will be making this at home too not just on camping trips!)
1 med. onion, chopped
Lots of butter
Brown in the dutch oven.
Add 1 package of cut up chicken breast. Brown.
Add:
1 can tomato sauce (15 oz.)
4 cups water
1 Tbsp. onion onion seasoning (Tastefully Simple) or similar
Bring to a boil, add:
1 cup brown rice (soaked previously is preferrable)
1 tsp. salt
Shake of curry
Cook for 30 min or until rice is almost done, add:
1 can pinto beans
2-3 cups fresh green beans (optional)
It turns out to be sort of a stew and it was wonderful. The green beans were a last minute add on, you could use peas or nothing green or throw in whatever sounds good. We like to experiment.
Enjoy!
(P.S. I will be making this at home too not just on camping trips!)
Thursday, September 8, 2011
Onion Soup Mix
3 tsp. minced dried onion
2 tsp. onion powder
1 tsp. salt
This is the ratio. Mix up a batch and store in an old onion powder shaker. Label. 2 Tbsp. = 1 package of mix from the store.
You will never go back!! So easy and yet without all the additives.
(I recommend not using old ingredients to get the best results. Go to the store and buy fresh seasonings.)
2 tsp. onion powder
1 tsp. salt
This is the ratio. Mix up a batch and store in an old onion powder shaker. Label. 2 Tbsp. = 1 package of mix from the store.
You will never go back!! So easy and yet without all the additives.
(I recommend not using old ingredients to get the best results. Go to the store and buy fresh seasonings.)
Taco Seasoning
6 tsp chili powder
4 1/2 tsp cumin
5 tsp paprika
3 tsp. onion powder
2 1/2 tsp garlic powder
1/8-1/4 tsp cayenne pepper
Put in an old chili powder shaker. Label as Taco Seasoning with 5 tsp. /per pound.
4 1/2 tsp cumin
5 tsp paprika
3 tsp. onion powder
2 1/2 tsp garlic powder
1/8-1/4 tsp cayenne pepper
Put in an old chili powder shaker. Label as Taco Seasoning with 5 tsp. /per pound.
Wednesday, February 23, 2011
Dana wants a pink heart cake for her birthday.
I am going to make a pineapple carrot cake with Whole wheat flour and rapadura and cream cheese frosting sweetend with maple syrup and tinted with the red food coloring.
1 bunch beets
vinegar
Scrub the beets under hot running water to wash away any dirt or pesticides (if using non-organic). Beets will stain your skin, but it can be washed off with soap and water.
Add the beets into the pot (I also added the red stems chopped up), cover the beets with water and bring to a boil over medium high heat. Cook until the beets are fork tender. Remove from the heat.
Pull the beets from the pot. Reserve the cooking liquid. Peel and chop the beets, pouring any juice that comes out of them back into the cooking liquid. Add the chopped beets back into the cooking liquid and let soak for at least four hours.
Strain the liquid into the jar. Add 2 tsp. of vinegar. Cover and store. You can use in similar amounts as artificial food coloring, but the results may vary depending upon the variety of beet used. Experiment to find the proper amounts to achieve the color you want.
This is from www.ehow.com
I am going to make a pineapple carrot cake with Whole wheat flour and rapadura and cream cheese frosting sweetend with maple syrup and tinted with the red food coloring.
1 bunch beets
vinegar
Scrub the beets under hot running water to wash away any dirt or pesticides (if using non-organic). Beets will stain your skin, but it can be washed off with soap and water.
Add the beets into the pot (I also added the red stems chopped up), cover the beets with water and bring to a boil over medium high heat. Cook until the beets are fork tender. Remove from the heat.
Pull the beets from the pot. Reserve the cooking liquid. Peel and chop the beets, pouring any juice that comes out of them back into the cooking liquid. Add the chopped beets back into the cooking liquid and let soak for at least four hours.
Strain the liquid into the jar. Add 2 tsp. of vinegar. Cover and store. You can use in similar amounts as artificial food coloring, but the results may vary depending upon the variety of beet used. Experiment to find the proper amounts to achieve the color you want.
This is from www.ehow.com
Thursday, January 20, 2011
Salmon Pancakes
1 can wild pink salmon (15 oz.)
3 eggs
8 organic saltines
Salt
Pepper
Curry
Onion Powder
Chopped onion
dill weed
Mix all together and fry in coconut oil.
My kids LOVE these, without the onion and dill.
For a dipping sauce I squirt some organic ketchup into homemade mayo.
3 eggs
8 organic saltines
Salt
Pepper
Curry
Onion Powder
Chopped onion
dill weed
Mix all together and fry in coconut oil.
My kids LOVE these, without the onion and dill.
For a dipping sauce I squirt some organic ketchup into homemade mayo.
Guacamole
2 Avocados
1 Tbsp. cilantro
1 Tbsp. lemon juice
1/2 tsp salt
1/2 tsp. onion powder
1/2 tsp. minced garlic
1/4 tsp. chili powder
1/4 tsp. paprika
Mash avocado. Add the rest.
1 Tbsp. cilantro
1 Tbsp. lemon juice
1/2 tsp salt
1/2 tsp. onion powder
1/2 tsp. minced garlic
1/4 tsp. chili powder
1/4 tsp. paprika
Mash avocado. Add the rest.
Sloppy Joes
1 lb venison
1/2 c. onion, finely chopped or onion powder
1 small can tomato sauce
2 Tbsp. quick oats
1 tsp. chili powder
2 tsp. worchestershire
1/2 tsp. garlic salt
1/4 cup water or less
1/2 c. onion, finely chopped or onion powder
1 small can tomato sauce
2 Tbsp. quick oats
1 tsp. chili powder
2 tsp. worchestershire
1/2 tsp. garlic salt
1/4 cup water or less
Alfredo sauce
1/2 cup butter
1 pkg. cream cheese (8 oz)
1 cup cream or half milk half cream
1/3 cup parmesan cheese
1 Tbsp. garlic powder
Melt butter and cream cheese. stir often to combine. (If it will not combine will it needs to be stirred really fast or use a food processor to save the sauce)
Add the rest and let it sit to thicken.
Serve with noodles and shrimp or chicken.
1 pkg. cream cheese (8 oz)
1 cup cream or half milk half cream
1/3 cup parmesan cheese
1 Tbsp. garlic powder
Melt butter and cream cheese. stir often to combine. (If it will not combine will it needs to be stirred really fast or use a food processor to save the sauce)
Add the rest and let it sit to thicken.
Serve with noodles and shrimp or chicken.
Sunday, November 21, 2010
How to "filet" a grapefruit!
This may seem like a silly post but I enjoy my grapefruit so much more since I have mastered this technique. You may find it is true for you or you may prefer your old method. But consider if this may be something that helps you enjoy grapefruit.
Grapefruit is one of the healthiest fruit especially for people that have blood sugar problems because as you may guess it does not have as much fructose and does not spike your blood sugar as much as other sweet fruits would. It also provides Vitamin C, calcium, iron, potassium, folate and lycopene (if they are red or pink).
One grapefruit has 12 grams of fiber if you eat it like an orange. That is with the skin around the individual segments. My technique removes the flesh from the walls so does not provide the fiber. The walls make it more bitter tasting, so you need to decide what you prefer.
 After removing the first piece cut right on the other side of the skin wall.
 Then twist your knife back 180 degrees and cut back out along the next skin wall (Your sharp side of the knife should come out first right next to the segment wall.
 Voila!
 You should be left with clean walls. The flesh wants to come free of the walls once you get it going.
 Once I have all the segments out I take the rest of the grapefruit and squeeze all the juice out of it, and there usually is a lot! Fresh squeezed grapefruit juice. Yum!
 And here you have your reward for your work. A bowl of segments ready to enjoy without further fussing!
Grapefruit is one of the healthiest fruit especially for people that have blood sugar problems because as you may guess it does not have as much fructose and does not spike your blood sugar as much as other sweet fruits would. It also provides Vitamin C, calcium, iron, potassium, folate and lycopene (if they are red or pink).
One grapefruit has 12 grams of fiber if you eat it like an orange. That is with the skin around the individual segments. My technique removes the flesh from the walls so does not provide the fiber. The walls make it more bitter tasting, so you need to decide what you prefer.

 After removing the first piece cut right on the other side of the skin wall.
 Then twist your knife back 180 degrees and cut back out along the next skin wall (Your sharp side of the knife should come out first right next to the segment wall.
 Voila!
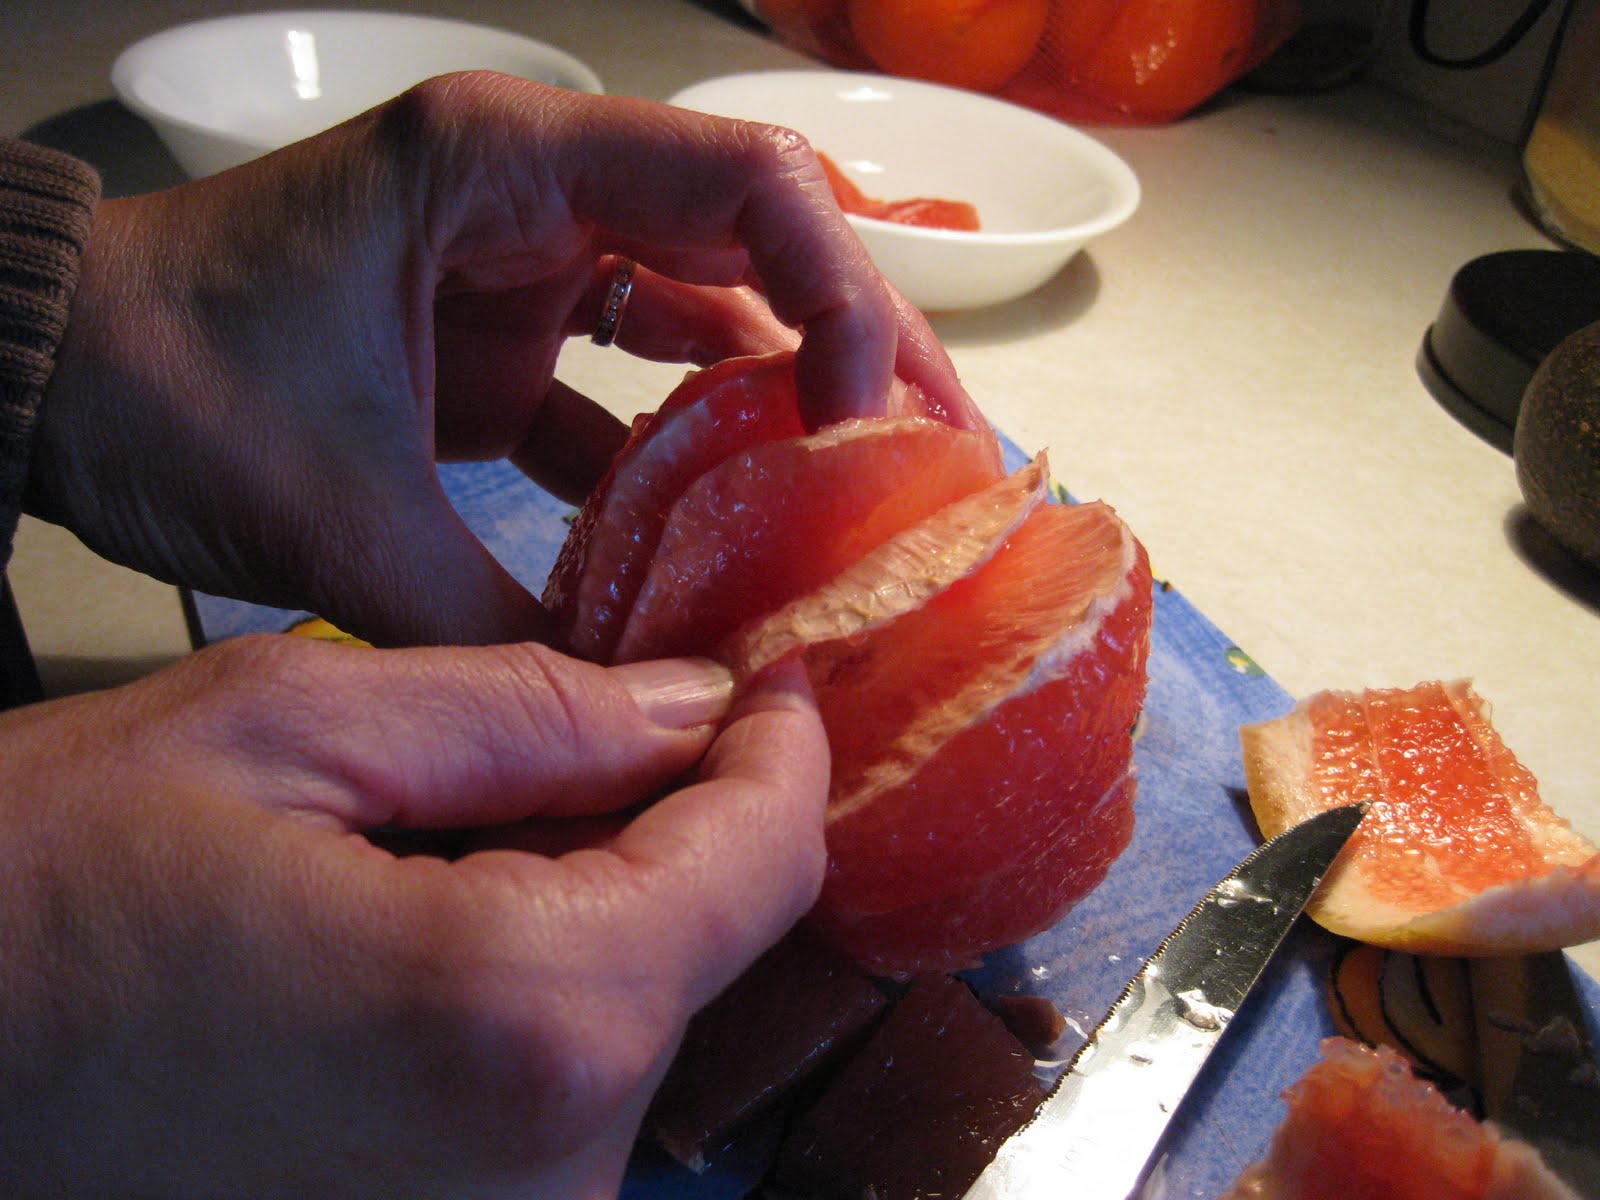 You should be left with clean walls. The flesh wants to come free of the walls once you get it going.
 Once I have all the segments out I take the rest of the grapefruit and squeeze all the juice out of it, and there usually is a lot! Fresh squeezed grapefruit juice. Yum!
 And here you have your reward for your work. A bowl of segments ready to enjoy without further fussing!
So here is a series of photos that show you how to prepare your grapefruit so you can just sit down afterwards and enjoy it.
Subscribe to:
Posts (Atom)