Sunday, November 21, 2010

How to "filet" a grapefruit!

This may seem like a silly post but I enjoy my grapefruit so much more since I have mastered this technique. You may find it is true for you or you may prefer your old method. But consider if this may be something that helps you enjoy grapefruit.
Grapefruit is one of the healthiest fruit especially for people that have blood sugar problems because as you may guess it does not have as much fructose and does not spike your blood sugar as much as other sweet fruits would. It also provides Vitamin C, calcium, iron, potassium, folate and lycopene (if they are red or pink).
One grapefruit has 12 grams of fiber if you eat it like an orange. That is with the skin around the individual segments. My technique removes the flesh from the walls so does not provide the fiber. The walls make it more bitter tasting, so you need to decide what you prefer.


After removing the first piece cut right on the other side of the skin wall.
Then twist your knife back 180 degrees and cut back out along the next skin wall (Your sharp side of the knife should come out first right next to the segment wall.

Voila!
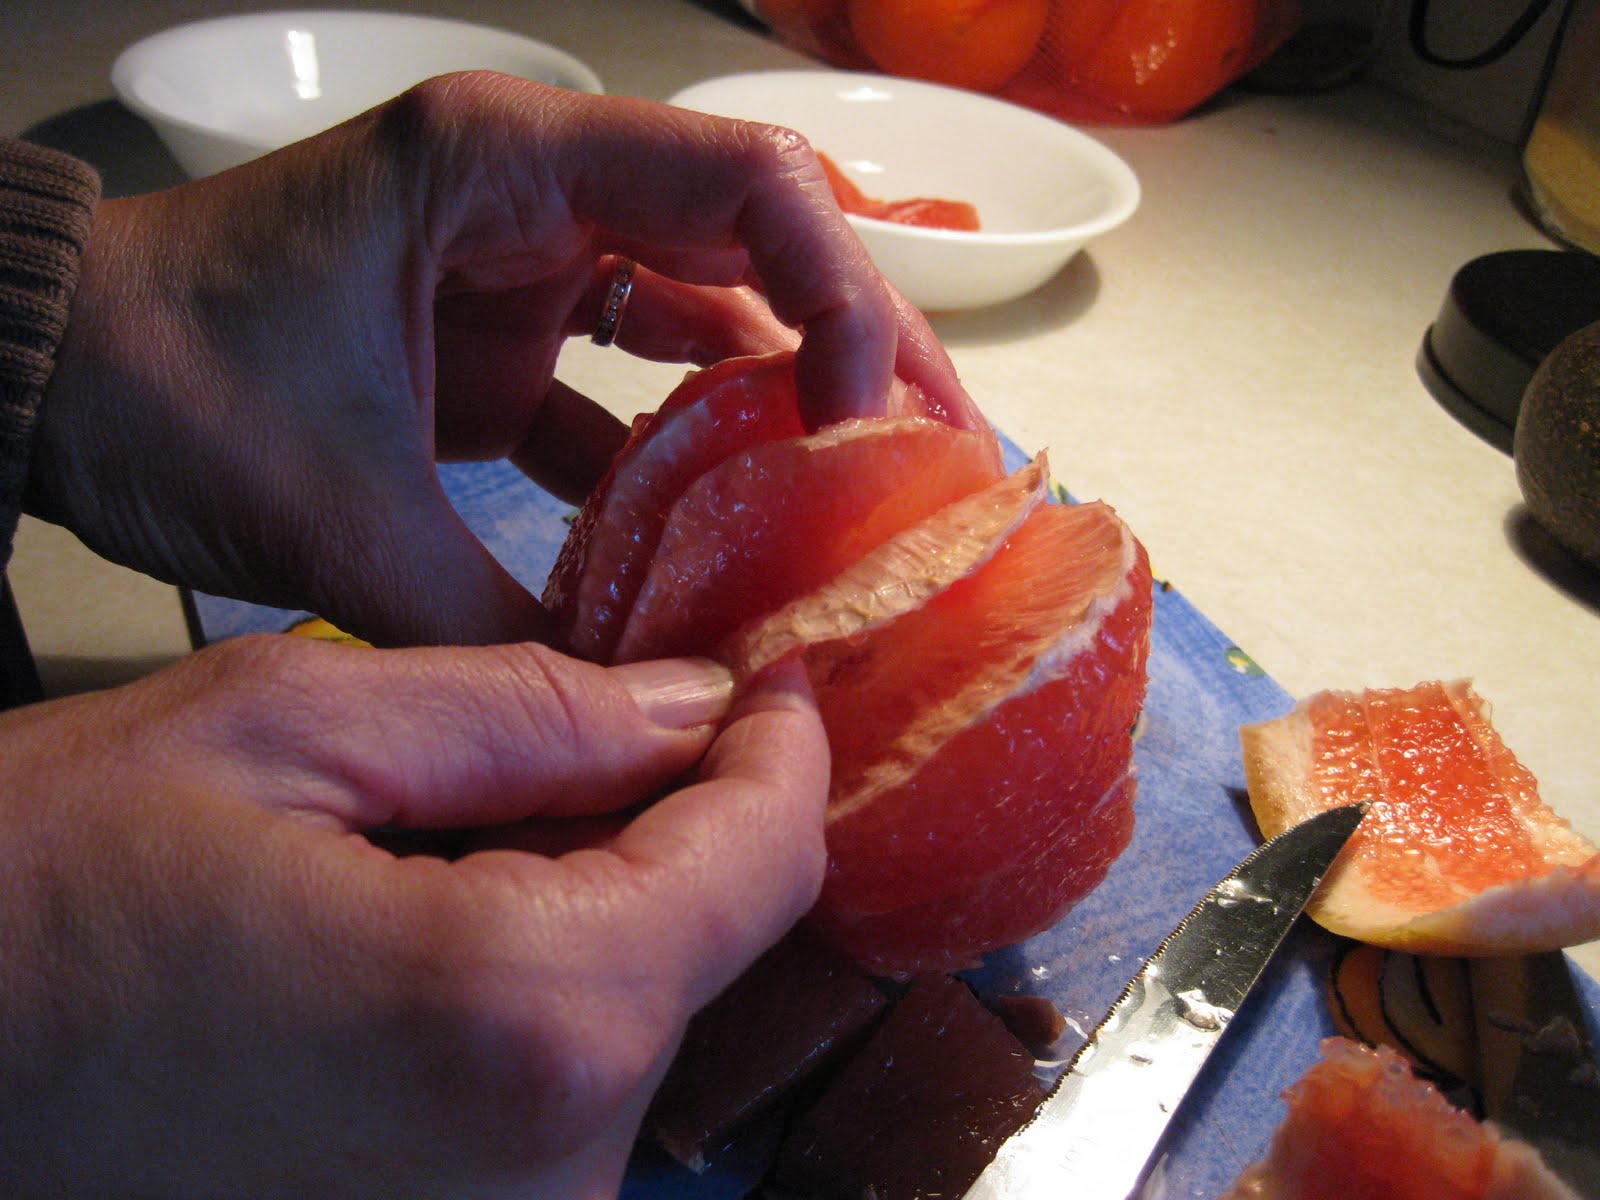
You should be left with clean walls. The flesh wants to come free of the walls once you get it going.
Once I have all the segments out I take the rest of the grapefruit and squeeze all the juice out of it, and there usually is a lot! Fresh squeezed grapefruit juice. Yum!

And here you have your reward for your work. A bowl of segments ready to enjoy without further fussing!


So here is a series of photos that show you how to prepare your grapefruit so you can just sit down afterwards and enjoy it.


Basic Chicken Stock


No nourishing household should be without this powerhouse of a simple nourishing food. It takes some planning and some being home but otherwise is not time-consuming and so rewarding. By simmering a whole chicken all day you are making the most of this animal because you are getting all the minerals out of the chickens bones and all the gelatin out of the cartilage. Home-made Chicken broth is the number one source for non-dairy calcium. If you are sick you absolutely have to have home-made broth to recover quickly and that is not the time to start making it, so having some on hand is a good insurance especially in the winter. Homemade broth is a better alternative to gatorade when you need to replenish electrolytes. So here is the recipe. It will be second nature before too long and routine in your life and you won't want to miss the flavor of soups made with real chicken stock.


1 whole chicken, preferrably organic or local pasture-raised, can be cut up

1 onion

2 carrots

3 stalks celery

4-5 quarts water

vinegar and parsley, optional


You will need a fairly big stock pot for this. Cut the chicken apart into legs, arms, wings. Don't add the giblets, but do add the neck. Pour in the water. For a small chicken I use 4 quarts for a bigger one 5 quarts. It's up to you. Chop up the vegetables and add to water. At this point if you want to fine-tune you add a shot of vinegar which pulls the minerals out of the bones more. Bring to a boil and simmer 6-24 hours. The longer the better for taste and mineral content. If you want to fine-tune again add a bunch of fresh parsley for the last ten minutes before turning it off. It adds some more nutrients (I forgot which ones).

I usually take the chicken meat off after 2-3 hours and return the rest of the bones etc. into the pot to cook. Now you have some wonderful cooked chicken for chicken salad, enchiladas, quesedillas, soups or whatever recipe uses cooked chicken.

Enchilada sauce

Enchilada sauce from the store is usually full of unhealthy soybean oil, MSG and a long list of other additives. When I started to look into making it myself I was pleased to learn that it is really pretty simple. I don't think I have hit on the final version yet but I will post my first attempt here as an encouragment to try it yourself.

2 Tbsp. oil ( I used coconut oil, I wonder if butter would work?)
2 Tbsp. flour
1 1/2 Tbsp. chili powder (more if you like it spicy. This amount was good for the kids.)

Make a roux out of these ingredients, i.e. melt oil, stir in flour and powder into a paste.

1 (15 oz.) can tomato sauce
2 cups water or broth
Pinch salt
1 tsp. cumin
1/2 tsp garlic powder
1/4 tsp. onion powder

Add the rest of ingredients and simmer for 15 minutes to thicken. I started this sauce with water and it really tasted watery to me so I added a healthy boullion cube. Next time I would just use 2 cups broth instead.

Another option is if you have too much juice in a crockpot after making a roast. It makes a great base for an enchilada sauce. I will be tinkering with this recipe some more to perfect it but for now, this came out delicious when I made enchiladas with the chicken out of the broth pot mixed with the sauce and wrapped in home made tortillas smothered in more sauce and cheese.

It would be easy to make more of this and freeze it in the right proportions. This makes about enough for 2 batches of enchiladas in a 9x13 pan. Depends on how much sauce you like.

Sunday, November 7, 2010

Pumpkin Pie Dessert

I feel guilty posting this on my nourishing blog since clearly this dessert is not nourishing, but I am not above sneaking the occasional sweet treat. When eating a treat there are several ways to still make good choices (i.e. no hydrogenated fats), choosing homemade over store-bought, if they have lots of sugar its better if they have lot of fat to make the sugar get in your bloodstream faster.....

So here goes a dessert that is to-die for and makes the cut of being worth it!

2 1/2 cups crushed organic butter-flavor crackers (not quite one box)
1/2 cup sugar (I used rapadura)
3/4 cup butter, melted
2 cups cold milk (I used half and half)
2 pkg. (3.4 oz each) instant vanilla pudding
1 can (15. oz.) solid pack pumpkin
1 1/2 tsp. pumpkin pie spice
1/2 tsp. cinnamon

In a bowl, combine the cracker crumbs, sugar and butter. Press into a greased 9x13. Set aside. In a bowl, whisk milk and pudding mix for 2 min. Stir in pumpkin and spices. Spread over crust. Refrigerate for 3 hours or until set. Garnish with whipped cream and nuts if desired.

(Source: Taste of Home)

This is a great thing to bring to a potluck or make for a party otherwise you will be tempted to eat the whole thing yourself!!!

(I suppose to make it more nourishing I could make my own vanilla pudding to use in this.)

Sunday, October 3, 2010

Blintz Pancakes

This is a nutrient dense, fairly low carb, very satisfying breakfast. This would be great for breakfast before a long day of snowmobiling or hunting. The kids love these spread with a thin layer of jam spread over them and rolled up.

1 cup white whole wheat flour
1/2 tsp salt
1 cup (8oz.) sour cream
1 cup 4% cottage cheese
4 eggs, lightly beaten

In a large bowl, combine the flour, sugar, and salt. Stir in the sour cream, cottage cheese and eggs until blended.

Pour batter by 1/4 cupfull onto greased hot griddle. Turn when bubbles form on top.

I have been known to serve this for a quick dinner in desperate situations!!!

This recipe is adapted from a Taste of Home recipe.

Frozen "Mounds" Candy bar bites

1/3 cup unsweetened coconut flakes (dessicated coconut)
1/2 cup of coconut oil
1/4 cup honey (raw is nice)
1 tsp. almond extract
1/2 cup chopped almonds

1. Melt the coconut oil and honey over low heat just until soft enough to stir together. Don't liquify. Whisk with fork to combine. Add the almond extract and chopped nuts.

2. Take out a mini-muffin tin. In each compartment, place about 1/2 Tbsp. of coconut oil mixture. Sprinkle with coconut flakes. Place in freezer on a flat surface for about 30 minutes.

Chocolate sauce:
3/4 cup cocoa powder (not dutch process)
1/4 cup honey
1 cup coconut oil
1 Tbsp. vanilla extract

3. Combine these 4 ingredients in a 2 cup glass measuring cup and place in a pot of simmering water. Heat until everything is just melted and remove from heat. Either whisk briskly or use hand blender to combine well.

4. Take out your muffin tins with coconut mixture and divide chocolate sauce over it. About 1 Tbsp. per compartment.

5. Put back into freezer and freeze until hard. When solid you can pop them out and chop into pieces and store in a container. They need to be stored in the freezer since they melt quickly.

This recipe is based on a similar recipe here: www.thenourishinggourmet.com

This is a great way to have a treat that gets you your dose of coconut oil for the day.
I like the chopped nuts option especially for kids (unlike the original recipe).

Good luck!

Thursday, September 23, 2010

Spaetzle (german dumpling noodles)

2 1/2 cups flour (I use half white whole wheat and half all-purpose)
1/4 tsp. salt
2 eggs
1/2 cup milk
1/2 cup water
1/2 cup butter

Beat eggs lightly, add milk and water. Place flour and salt in a bowl and gradually add the egg mixture. It will be pretty gluey and sticky.

Bring 3-4 quarts of salted water to a rolling boil. Squeeze dough through spaetzle maker into the boiling water. Cook til spaetzle floats, about 1 minute, stirring to keep from sticking together. Strain and remove excess water by placing on paper towel.
Toss with melted butter.

I actually just squeeze the spaetzle dough all in there and when its all in I drain it and add butter. And it's just fine. I don't remove it after a minute or stir much or put it on paper towel, so you would need to decide how much you want to fuss.

Crockpot Hungarian Goulash

This recipe is one of my favorite since it reminds me of my favorite dish at the Brauhaus restaurant.

2 lbs round steak or venison steak, cubed
2 Tbsp. flour
1/2 tsp. onion powder
1/2 tsp. garlic powder
1/2 tsp. salt
1/2 tsp pepper
1 1/2 tsp. paprika
I add curry powder since that is my favorite. Maybe 1/2 tsp. or more
1 can tomato soup (I use 1 pint home-made tomato soup)
1/2 soup can water
1 cup sour cream

Put meat into crockpot. Mix powders and flour and stir into meat. Add all remaining ingredients except the sour cream. Stir well. Cover and cook on low for 8-10 hours or high for 4-5 hours. Add sour cream and warm for 30 min.
Serve over Noodles or Spaetzle.

I always make Spaetzle for this recipe since it goes so well together and they are very fast to make. I do have a Spaetzle maker that I bought at http://www.lehmans.com/

Crockpot Pheasant or Duck

This is my favorite way to cook pheasant breasts or duck breasts (you could do it with chicken of course.)

About 4 breasts
2 cans of cream of Mushroom soup (or one batch homemade cream of mushroom soup made with two cups cream)
1 cup home-made chicken broth (or beef)
2 tsp. Worchestershire sauce (without MSG)
1/2 tsp. garlic powder

Selection of your favorite herbs, such as oregano, basil and parsley.

Combine ingredients, pour over breasts in crockpot and cook on low for about 7-8 hours. Serve over Wild Rice. (Wild Rice is more digestible and nutrients more available to you if you soak it for 7-12 hours first. To soak: Rinse wild Rice, put into a bowl with warm water and add 2 Tbsp. of kefir, buttermilk, vinegar or lemon juice, set into oven with the lamp on to keep the temperature up a little. Just before cooking drain and cook in fresh water.)

Wednesday, September 22, 2010

Pumpkin Chocolate Chip Cookies

This must be one of my favorite cookies. They still turned out great when I substituted healthier ingredients. Be warned: this makes a large batch.

1 1/2 cups butter, softened
2 cups brown sugar (I used 2 cups rapadura plus about 2-3 Tbsp molasses to make it moister)
1 cup sugar (I used 1/2 cup brown sugar)
1 can (15 oz.) solid pack pumpkin
1 egg
1 tsp. vanilla extract
4 cups all purpose flour (I used white whole wheat pastry flour and may have added a little more when it seemed to runny)
2 cups quick cooking oats
2 tsp. baking soda
2 tsp. cinnamon
1 tsp. salt
2 cups (12 oz) semisweet chocolate chips

In large mixing bowl, cream butter and sugars. Beat in the pumkin, egg and vanilla. Combine the flour, oats, baking soda, cinammon and salt. Gradually add to creamed mixture. Stir in Chocolate chips. Drop by Tablespoonfuls 2 inches apart onto ungreased baking sheets. Bake at 350 for 10-12 minutes. Make sure they are done or they will fall apart. Remove to wire racks to cool.

This is originally from Taste of Home or what used to be Quick Cooking Magazine.

Sorry, I have no photos but thought I would share this.

Monday, September 13, 2010

Zucchini Germanica

My favorite way to eat small zucchinis. My Mom in Germany served these to us last summer and they were delicious, so I named them after my home country!

Melt a couple of tablespoons of good-for-you butter in a heavy skillet. Slice zucchinis lengthwise. Add to skillet. Season with your favorite spices. I like onion powder, curry, paprika, pepper and sea salt. Flip when they start getting soft or brown a little. Flip over and add seasoning to other side if you'd like. Be careful not to overcook them. They should not turn translucent, just tender enough to eat.

Guten Appetit!

Check out this website if you want to know why butter is so good for you!

Friday, September 10, 2010

My yogurt recipe

For this recipe you would need:
  • a 2-quart yogurt maker such as "Yogourmet"
  • A double boiler
  • a digital thermometer

2 quarts milk (ideally raw, organic, grassfed)
1/2 Tbsp plus 1 tsp. (is that 2 1/2 tsp?) unflavored gelatin (or one pkg from the store)
4 Tbsp. plain (unsweetened unflavored) whole milk yogurt (store or previous batch)

Put water in the bottom pan and start it heating up. Reserve about 1/3 cup of milk in a measuring cup. Add milk to the top pan and insert thermometer. (Since I use raw milk I need to heat it to 160 F to kill competing bacteria). While milk is heating, add gelatin to the reserved milk in the measuring cup to dissolve. Set aside. Turn off heat when milk reaches 160 and set the top pan with the milk into the sink with an inch or so of cold water to start in cooling down. Slowly pour the gelatin milk mixture into hot milk while whisking briskly. Prepare the yogurt maker according to instruction and get your container ready with the yogurt starter. When milk has cooled to 112 degrees F pour into container and whisk or stir well. Milk should be between 108 and 112 F. cover and put into yogurt maker. Set timer for 5 hours. Move the yogurt into the fridge without disturbing it and give it at least 10-12 hours before opening it. Cream will be at the top. The yogurt will still thicken slightly after that but it should be stiff enough where you can scoop with a spoon and leave a smooth mark.

There are other ways to make yogurt but this is what I do. I invented the part where you add the gelatin (which I buy in bulk at azure standard) after you take it off the heat. It seemed to have improved the thickness of my yogurt. Good luck!

Saturday, August 14, 2010

Favorite Tomato Soup

5-6 lbs tomatoes (about 16 medium)
2 small onions, chopped
2 (6 oz.) cans tomato paste
3 Tbsp. brown sugar
2 tsp. Sea salt
1 quart chicken broth
3 basil leaves, chopped (optional)
1 garlic clove, minced (optional)

Put all ingredients into a stockpot. Boil uncovered for 20 min. or til tomatoes fall apart. Strain through fine sieve. Enjoy!

Is't that easy? And so delicious and nourishing! I have also canned the recipe. But you need to add lemon juice to the jars (I think its 4 tsp per quart, 2 for pints) and the processing is 35 minutes I think. Don't quote me on that. I have read different things since soup is not often listed for canning and with the broth it has a small amount of fat in it. According to my research the fat is not an issue in such small amounts.

Anyway, if you don't can it, it is still worth the effort. You can halve the recipe or freeze it. I can alot of pints and use it in recipes instead of campbell's. Works wonderful. Let's see if I can can enough this year to avoid using Campbells....

Blueberry sauce for plain yogurt

I thought I would share this idea for those of you who would like to make plain yogurt more interesting without it becoming the sugar-bomb that flavored yogurts are.

I make our yogurt in a quart size yogurt maker. I add gelatin just before I start cooling it down and let the yogurt incubate or 5 hours. It comes out with a wonderful thick consistency and tangy taste. Of course for most of us including my kids and husband this tangy taste it too much to enjoy eating it straight. In a pinch I eat my yogurt with some frozen blueberries thrown in and a small handful of granola. No other sweetener. For the kids I usually use honey or if I have time I make a blueberry sauce, which when strirred in turns plain yogurt into something very similar to a store version.

I don't actually have exact measurements. I just use a small saucepan and fill it half with frozen blueberries (bulk from Azure Standard). I add some water, maybe half a cup in which I have dissolved some arrowroot powder (could use cornstarch) for thickening. How much water and thickening agent depends on how you like your sauce, do you want more blueberries or more sauce and do you want it runny or like jelly? I start heating it to boiling and add some honey, maybe 3 Tbsp (?) I make it rather sweet. Too sweet when eaten straight since it will be mixed with yogurt and is supposed to sweeten it too. Again, depends on how sweet you want it. Just try it and experiment a little. When you think you hit on the right combination for your family write it down!

Then I just keep the finished sauce separate in the fridge and mix up little with yogurt before serving. Not sure what would happen if you added it to your whole batch of yogurt. Might work.

This could also be done with strawberries, raspberries etc. but you would deal with seeds then unless you strain it.....too much work!

This is how my husband eats the yogurt if there is no blueberry sauce around: He uses Nesquick Chocolate Syrup and makes chocolate yogurt out of it!!!! Yuck!!

Thursday, August 5, 2010

Fermented Cucumbers/Sour pickles

I have finally tried to make pickles without vinegar and they are superb. I used Sandor Katz's recipe from his book "Wild Fermentation" and the flavor was right on and I am not even a pickle person. I literally never have pickles in my fridge or would ever touch the ones at a restaurant. I did eat pickles some growing up but they were always very garlicky and better somehow. Now that I have learned that true fermented pickles are actually health food that aids in digestion and supports the immune system I was willing to try it for myself and I am more than pleased with the results. And it is really very easy. The hardest part was peeling all those garlic cloves but it was well worth the effort. The oak or grape leaves by the way supposedly keep them from getting mushy. Seemed to work for me.

Here now the recipe:

3-4 lbs small to medium cucumbers
6 Tablespoons sea salt
3-4 heads fresh flowering dill (or 3-4 Tbsp. of any form of dill)
2-3 heads of garlic, peeled (not cloves, heads!) I only had about 1 1/2 heads. So I used those.
1 handful fresh grape, cherry, oak and/or horseradish leaves (I put in 4 oak leaves of my trees!)
1 pinch black peppercorns

Process:
1. Dissolve sea salt in 1/2 gallon of water to create a brine.
2. In a crock place dill, garlic, leaves and peppercorns.
3. Place cucumbers in the crock.
4. Pour brine over the cucumbers. Place a clean plate over the them and weigh it down with a jug filled with water. The brine needs to cover the plate.
5. Cover the crock with a cloth to keep out bugs.
6. Check the crock every day. Skim any mold from the surface and don't worry about it. It only forms where air is present.
7. Taste the pickles after a few days. They ferment faster in warmer spots.
8. After one to 4 weeks, depending on temperature, move them to the fridge where fermentation will be slowed down greatly.
9. They are ready to eat at any point when they taste right to you.

Even the kids like these pickles. Just eating a little bit with your lunch or dinner will greatly improve your absorption and digestion.

A note on equipment:
A real crock is very expensive and I don't own one. At the thrift store I found a ceramic container that has "Flour" written on it, such that people would use in a kitchen to store their flour, sugar etc. It has straight sides and I jsut found a plate at home that would fit inside. Then I filled an old apple sauce jar with water as a weight and covered the whole thing with a flour sack towel. It worked.

Thursday, June 17, 2010

Best Banana Bread

2 cups white whole wheat flour (or regular flour)
1/2 cup white sugar
1/4 cup rapadura
3/4 tsp. baking powder
1/2 tsp salt
1 cup chopped walnuts
3 large ripe bananas, mashed well
1/4 cup plain yogurt
2 large eggs
6 Tbsp. butter, melted and cooled
1 tsp. vanilla

Combine the first 5 ingredients. Set aside. Mix mashed bananas, yogurt, eggs, butter and vanilla. Lightly fold banana mixture into dry ingredients until combined and batter looks thick. Pour into greased pan. Bake for 55 minutes in 350 F oven.

I actually put the peeled, whole bananas in the stand mixer and mashed them in there and added the rest. Then added the flour mixture. I just made sure I only ran in to just combine, as to not overmix it.

Tuesday, June 1, 2010

Apple Rhubarb Crisp

I was looking for a way to use some apples from the freezer and to cut down the sugar in the rhubarb recipes I have. This uses only 1 cup of sweetener (1/2 sugar, 1/2 rapadura) per 9x13 pan. Usually its 1 1/2 to 2 cups. The results were delicious and not overly sweet but just enough.

Apple Rhubarb Crisp

4 cups frozen apples
2 cups fresh rhubarb
1/2 cup sugar

1/2 cup butter
1 cup whole wheat flour
1/2 cup rapadura
1 tsp. cinnamon
Dash salt
1/4 cup to 1/2 cup quick oats

Barely thaw apples and spread in 9 x 13 pan greased with coconut oil. Chop up rhubarb and spread over apples. Sprinkle with 1/2 cup sugar.

Combine flour, rapadura, cinnamon, salt and oats. Cut in the butter. Spread over the apple and rhubarb. Bake in 350 oven for 35 minutes.

Thursday, May 13, 2010

Little Cheddar Meat Loaves

We like these better than a big meatloaf.

1 egg
1 Tbsp. milk
1 c. shredded Cheddar cheese
½ cup quick-cooking oats
½ cup finely chopped onion
1 tsp worchestershire sauce
1 tsp. Salt
1 lb ground venison
1/2 cup organic ketchup

In a bowl, beat egg and milk. Stir in cheese, oats, onion, and salt. Add venison and mix well. Shape into 8 loaves and place in a greased 9x13 baking dish. Spread with ketchup. Bake, uncovered at 350 for 45 minutes, until meat is no longer pink.

Holy Spririt, Fargo ND Cookbook

Gluten-free Monkey bars

These were really easy to make and very yummy!!! I think I used half brown sugar, half rapadura. Still a little too sweet. Could cut down the sugar.

BANANA CHOCOLATE COCONUT BLONDIES “MONKEY BARS”

1/4 cup butter for mixing
2-3 Tablespoons melted butter for topping
1 cup brown sugar
1 Tablespoon granulated sugar for topping
2/3 cup shredded coconut for mixing
1/4 cup shredded coconut for topping
1/2 cup semi-sweet chocolate chips for mixing
1/4 cup semi-sweet chocolate chips for topping
1 cup ripe, mashed bananas
1 teaspoon vanilla
1 cup Pamela’s Baking Mix (or other gluten-free flour combination with leavening)
1 egg
Directions:
Preheat the oven to 350 degrees. Grease a 9×13 baking pan. Mix 1/4 cup softened butter with the brown sugar until combined. Add the egg, mashed bananas, and vanilla. Add the Baking Mix. Stir in 1/2 cup of semi-sweet chocolate chips and 2/3 cup of shredded coconut. Pour in the prepared baking pan. Combine shredded coconut, melted butter, and sugar; sprinkle over top. Spread about 1/4 cup of chocolate chips over the top. Cook for 25-30 minutes or until golden brown.
This is from this great blog site:
http://glutenfreemommy.com/banana-chocolate-coconut-blondies-monkey-bars/

Tuesday, May 4, 2010

Baked Oatmeal

A grain treat for breakfast! This is chewier than cooked oatmeal and easy to warm up the next morning too. You can eat it like dessert if you serve it hot with vanilla ice cream!!!

1/4 cup butter
2 eggs
1/2 cup pure maple syrup
3 c. rolled oats
2 tsp. baking powder
1 tsp. salt
1 cup milk
1 tsp. cinnamon

Mix all together. Pour into glass pan. Bake @ 350 for 20-30 minutes.

(Variation: Put 1 quart fruit such as apples in pan first. Then pour mixture over fruit and bake.)

My favorite Kefir Smoothie


1 cup frozen blueberries
2-3 frozen strawberries
1/2 ripe banana
Kefir just to cover fruit
1-2 scoops homemade vanilla ice cream
Blend up and enjoy with a straw. If you didn't add too much kefir it will be very frosty thick! Yum! You can leave out the ice cream and just the frozen fruit will make it very frosty thick if you don't get too much liquid in there. I also often use just yogurt or kefir and yogurt or all three....you get the idea.
Healthy additions include:
freshly ground flaxseeds
melted coconut oil
nutritional yeast powder
other powders you need to ingest that day you may be able to add.

How to make Kefir (fermented milk)


Suggested equipment:

1 pint jar with lid (wide mouth works better)

Small strainer with plastic mesh (optional)
Plastic spoon ( I use a spoon-shaped baby fork.)
(It’s important not to use metal since it reacts with the grains and kefir.)


  1. Wash your hands.
  2. Strain the grains you received. Do not rinse them. Put them into a quart jar and add about 1 cup of milk. Cover loosely with lid. Raw whole milk is best, pasteurized milk will work. Ultra-pasteurized milk may not work. I would not recommend it. (Most organic milk in the store is ultra-pasteurized.)
  3. Let it sit out on the counter for 12-24 hours. Room temperature should be between 63-70 degrees F. The first batch or two after receiving the grains may not be good-tasting yet. The bacteria and yeasts need to get into balance again after sitting in milk and the fridge for a while. So you might need to toss the first one or two batches. It depends on how fresh the grains are.
  4. After one or two milk changes the kefir grains should be happy and balanced again. About 1-2 Tbsp of kefir grains are a good amount of grains for 2 cups of milk. If you added your milk in the evening check on the kefir the next evening. Does it smell slightly sour? Is it thickening? At this point you could strain the grains out or just give it a little shake to increase activity of the grains. If you let them go, check them again in the morning. My favorite length of time is about 18-24 hours.
  5. The kefir will thicken slightly and may be slightly chunky. If you are using raw milk the cream will rise and there may be pockets of whey. I used to strain the grains out, but they are usually in one clump so I just fish them out with my baby fork and then put the jar in the fridge. You could use ta strainer if you want. It has to have fairly big holes to let the kefir through.
  6. Put the grains into a fresh pint jar. Pour 2 cups fresh milk (it can be cold from the fridge) into  jar and loosely cover. Set out on counter. 
  7. After a few batches your grains have probaby grown and you may want to take out some grains and/or add more milk than before. Experiment until you find the taste and results you like. Kefir is also great for adding to soaking water for grains and legumes. So its great to have on hand. Can also be used in place of buttermilk in recipes. As your grains grow you can make more batches or larger batches. Keep it on hand for all your buttermilk needs. 
  8. Sometimes making one batch after another is too much. So after you have made 2 or 3 jars you might want to take a break for a few days. You just put your grains in a small jar and cover them with milk and keep them in the fridge for a few days. I would not let them sit longer than a week or they will get out of balance. I usually use them every 4 or 5 days.

This may seem complicated, but just like other things once you understand the process and do it often it becomes second nature. Don't fret just practice a little. It will come easy then.


Monday, May 3, 2010

Chocolate Ice cream

3 egg yolks, (know your source, fresh local is best)
3 oz. Pure Maple Syrup (could use honey or sugar to your liking)
1 Tbsp. pure vanilla
3 cups raw cream or whipping cream (not ultra-pasteurized)
(or 2 cups cream and one cup whole milk)
1/2 cup Cocoa powder processed with alkali (hard to find locally. Check Amazon.)

Cream egg yolk. Add the rest. Stir. Pour into ice cream maker.

It's important to get the right cocoa powder. This is not the normal baking cocoa If you don't use that cocoa you will get little clumps of cocoa and not the best flavor.

Vanilla Ice Cream

3 egg yolks, (know your source, fresh local is best)
1/2 cup maple syrup
1 Tbsp. pure vanilla
3 cups raw cream or heavy cream (not ultra-pasteurized)
(or 2 cups cream and 1 cup whole milk)

Beat egg yolks and blend in remaining ingredients. Pour into prepared ice cream machine and follow instructions.

Quick Baked Beans

3 cans beans (navy, kidney, black or pinto)
1 onion, pureed
1/2 lb. bacon

1/4 cup rapadura (or brown sugar)
3/4 cup ketchup
1/4 cup molasses
1 Tbsp. vinegar
1 tsp. dry mustard
1 tsp. garlic salt
1/2 tsp. ginger

Saute onions in butter. Combine sauce ingredients. Add rest of the ingredients. Bake uncovered for 3 hours @ 325. (Edible after an hour.)

Friday, April 30, 2010

Chicken Bean Soup

I came up with this soup today by looking at two different recipes and it was a hit.

1 quart chicken broth (homemade)
(1 cup cooked chicken (such as taken from the broth chicken parts), optional)
1 can diced tomatoes
2 cans navy beans
Basil to taste (fresh or dried)
Salt to taste (takes 1 tsp. for homemade unsalted chicken stock)
Onion, chopped
Butter

Saute onion in butter til tender. Add broth and other ingredients. Simmer and serve.

Creamed Spinach

I made my own creamed spinach for the first time tonight. I used frozen chopped spinach and on a whim just decided to dress it up. The recipe will need to be refined some, but this is a good start. I only made a small batch this time and didn't measure everything.

Here is what I did:

Cook 1 package frozen, chopped spinach in some water just till warm. Strain well.

Melt 2 Tbsp. butter in a small saucepan. Add 2 Tbsp. flour and whisk together right away under medium to low heat. Add 1/2 cup whole milk slowly to incorporate while whisking. Add onion powder, garlic powder and salt and pepper to taste. Add 2-4 Tbsp of parmesan cheese or to taste.

Stir strained spinach into cream sauce.
Yummy!! It could have used more of the spices so I will need to experiment with amounts.

I grew up with creamed spinach out of a box in Germany and loved it. I will finally be able to get back to that taste.

Wednesday, April 28, 2010

Grassfed Meatballs

2 eggs
1 cup oats, processed into coarse meal
1/3 cup organic ketchup (it doesn't have HFCS)
2 Tbsp. soy sauce, naturally fermented preferred
2 garlic cloves, minced
1/2 tsp. salt
1/4 tsp. pepper
2 lbs grassfed ground beef

Add first 7 ingredient. Add beef and mix well. I like to use my kitchenaid mixer to make it a breeze. Shape into 1 inch balls or use a ice cream scoop or a Tablespoon measuring spoon and place on cookie sheet. Bake @ 450 for 8-10 minutes or til no longer pink.

I like to eat them cold and with mustard! That's how I grew up eating them in Germany. Great for taking on a picnic.

Thursday, April 22, 2010

Homemade Mayonnaise

1 whole egg, at room temperature
1 egg yolk, at room temperature
1 tsp. Dijon mustard
1 1/2 Tbsp. fresh lemon juice
3/4 to 1 cup extra virgin olive oil or expeller-pressed sunflower oil or a combination
generous pinch salt

In your food processor, place egg, egg yolk, mustard, salt and lemon juice. Process until well blended, about 30 sec. Using the attachment that allows you to add liquids drop by drop, add oil with the motor running. Taste and check seasoning. Without added whey, mayo will keep for about 2 weeks.

Since we don't go through much mayo in 2 weeks, I will probably make a baby food jar of mayo into a horseradish dip by simply stirring some prepared horseradish into the mayo. Then I will use 1/4 cup for Ranch dressing and that leaves enough for the rest. Adjust according to your family's needs.

If you don't have a food processor with the named attachment I think you can still do it, but it is harder to do. Better search the web for some tips on doing it without. I have always used my food processor.

Good luck!!

Homemade Ranch Dressing


1/4 cup mayonnaise (not low-fat, preferrably homemade)


1/8 cup sour cream (not low-fat)


1 clove garlic


1 tsp. white vinegar


Fresh chives


Dill weed


Fresh Parsley


Onion Powder


Pepper

Buttermilk to thin


Mince the garlic with a knife, sprinkle with salt and mash into a paste with a fork. In a bowl combine mayo and sour cream. Add seasonings. Add vinegar. Add buttermilk to taste and to thin to preferred consistency. Adjust seasonings to taste. Taste it with a carrot or on some lettuce to get the right strength.

The versions of Ranch I have made most recently still have fresh chives and parsley in it thanks to some plants in my kitchen bay window. I hope to be able to keep them alive through the winter because the fresh taste makes all the difference in the dressing. I use about 5-6 straws of chive and about 5-6 "leaves" of parsley but that is totally up to your taste buds. Experiment and adjust. And although I made the first few batches of ranch without the buttermilk, it makes a huge difference to have buttermilk in it. I will never go without again!!!

A satisfying lunch


...in so many ways. It was nourishing, it was filling and it was so satisfying to me that all these things were homemade. That also made them so extra tasty. Here is what you see:


Friday, April 16, 2010

Chicken Broth

1 whole free-range chicken or 2 to 3 pounds of bony chicken parts, such as necks, backs, breastbones and wings*
gizzards from one chicken (optional)
2-4 chicken feet (optional)
4 quarts cold filtered water
2 tablespoons vinegar
1 large onion, coarsely chopped
carrots, peeled and coarsely chopped
3 celery stalks, coarsely chopped
1 bunch parsley
(*Note: Farm-raised, free-range chickens give the best results. Many battery-raised chickens will not produce stock that gels.)

If you are using a whole chicken, cut off the wings and remove the neck, fat glands and the gizzards from the cavity. Cut chicken parts into several pieces. (If you are using a whole chicken, remove the neck and wings and cut them into several pieces.) Place chicken or chicken pieces in a large stainless steel pot with water, vinegar and all vegetables except parsley. Let stand 30 minutes to 1 hour. Bring to a boil, and remove scum that rises to the top. Reduce heat, cover and simmer for 6 to 8 hours. The longer you cook the stock, the richer and more flavorful it will be. About 10 minutes before finishing the stock, add parsley. This will impart additional mineral ions to the broth.
Remove whole chicken or pieces with a slotted spoon. If you are using a whole chicken, let cool and remove chicken meat from the carcass. Reserve for other uses, such as chicken salads, enchiladas, sandwiches or curries. Strain the stock into a large bowl and reserve in your refrigerator until the fat rises to the top and congeals. Skim off this fat and reserve the stock in covered containers in your refrigerator or freezer.

This recipe is taken directly from "Nourishing Traditions" by Sally Fallon the Weston A. Price Foundation president. It sounds more complicated than it is. In a pinch, don't worry about letting it sit for an hour, or adding parsley. Great if you can but don't get bent out of shape if you don't have time for that. You can cook the broth for longer than 8 hours too, it gets more flavorful over time. Some people cook it for days....But I take the chicken meat off after 2-3 hours and then let the rest cook til the end. When the broth is all done and I have strained it and cooled it and taken the fat off, I use part of it to make soup and the rest I measure into 1 and 2 cup portions and freeze it in plastic freezer containers. When they are frozen, I pop them out and put them in large ziplock bags. That way they are always ready to go.

I do buy store chicken sometimes, the best I can find, and it works out ok. I guess J&B sells chickens from Hawley that may be a better bet. They are in the long open freezer diplays and reasonably priced.

Good luck with the broth.

Thursday, April 15, 2010

Flag soup


This recipe is so simple, yet so amazingly delicious I could eat it every day of the year. I even eat it in the summer and take it on camping trips. Everyone who eats it wants the recipe. I hope you love it too.

3 cloves crushed or finely chopped garlic
1 large onion, chopped
2 tablespoons butter or olive oil
2 quarts chicken broth
3 pounds all purpose potatoes, peeled and thinly sliced
1 pound fresh spinach, coarsely chopped
Salt and pepper
1 (15-ounce) can stewed tomatoes

In a deep pot, saute garlic and onion in butter or oil for 2 or 3 minutes. Add broth and bring liquid to a boil. As you slice potatoes, add them carefully to the broth. Cook potatoes 20 minutes, stirring occasionally. The potatoes will begin to break up and thicken broth as the soup cooks. Stir in spinach in bunches as it wilts into soup. Season soup with salt and pepper, to your taste. Stir in tomatoes and heat through, 1 or 2 minutes.


Note: This is originally a Rachel Ray recipe. I never measure potatoes or spinach, just use what I like. The original recipe called for 28 oz. tomatoes but I like the 15 oz. Btw, it is called flag soup because it has the colors of the Italian Flag in it, Rachel's heritage country!

Irish Leek Soup

2-4 Leeks
1 medium onion
4-6 medium potatoes ( I prefer yukon gold)
2 Tbsp butter
1 Quart chicken broth
1 cup sour cream
Salt and Pepper to taste

Cut leeks into 1/2 inch slices, chop onion, peel and dice potatoes. In large pot melt butter, add leeks and onions and cook covered til tender. Add potatoes and broth. Simmer, covered for 40 minutes. Add sour cream and heat to serve. Do not boil.

Note: Last time I made it I just had one jumbo organic leek, I mean mega big, probably as large around as a tennis ball or more. I just used that and we like it heavy on the potatoes, I usually eyeball it when I see how many are in the pot and adjust. It came out the best ever on this last batch.

Wednesday, April 14, 2010

Making Kombucha


Recipe:
A Kombucha "Mother" plus about 1 cup starter Kombucha from a friend
3 Quarts non-chlorinated water
5 Organic black or green tea bags (caffeinated)
1 cup white sugar

Equipment:

A large glass gallon jar, I use a lemonade jar with spout, but other jars would work too
Coffee filter and rubber band or similar
Canning jars and lids or bottles
A strainer with plastic mesh (optional)


Pour the water into a large pot and bring to a boil. Turn off heat. Add sugar and stir to dissolve. Add the tea bags and cover. Set timer for 15 minutes. Remove tea bags when timer beeps and let tea cool. You don't want to kill your "mother"! When tea is cool pour it into the jar and gently add the starter Kombucha and the "mother" so she floats on top. Cover with coffee filter and secure with rubber band. Set into a warm spot 70-80 degrees for 5-7 days. You can taste it after 5 days and see if the sweetness is right for you. The sooner you drink it the sweeter it will be. If you want more sugar to be fermented out of it, you can wait a little longer.


After 5-7 days you will see little bubbles and smell vinegar. The kombucha should be ready. Take out the mother with very clean hands or a plastic spoon. (Never use metal with live cultures) Put the mother and about a cup of Kombucha in a quart jar and set aside. You are now ready to bottle your Kombucha. Canning jars work well for me and I fill them as full as possible to retain some fizz. The kombucha is actually naturally effervescent. It just amazes me! Refrigerate when done. Pour into wine glass to enjoy!! I start the new batch right away and while it ferments we consume the jars I bottled up. It works nice for our family. There are other methods, such as continuous kombucha and secondary fermentation. Search the web for more information on those methods.
Good luck! Prost!


Note: you may want to strain some of the fuzzies out of there. I strain some and otherwise just fish out stuff when I open the jars. Your preference. In either case it won't hurt you any if you don't remove them. Do not use a metal mesh strainer since metal reacts with live cultures. It is somewhat difficult to find plastic mesh strainers. I found some on the "Cultures for health" website, but the mesh is not very fine and won't strain out much.

Tuesday, April 13, 2010

Homemade Crackers

I use the recipe on this great site:


The flour I use is Azure White Whole Wheat Flour.
Skip the soaking step if you are not comfortable with that. Just put all ingredients together and roll out. Bake them longer than you think so they are nice and crispy. Let them cool for a long time before putting them away or they will soften up in storage.


The soaking step is to remove anti-nutrients in the flour. You can read more about soaking your grains here:

Cream of Mushroom Soup (Substitute)

Don't be intimidated. Once you have the trick down it is really fast and easy. Give yourself a few tries to get it right and then you will not want to go back to the store stuff!


4 Tbsp. butter
1/4 c whole wheat flour
1 tsp. salt or more to taste
12 fresh mushrooms, chopped small
2 cups of milk or cream (or a combination of both)

Heat butter, then add flour and salt, stirring to make a roux. Add mushrooms and cook a couple of minutes, just to soften. Add milk and stir until thickened.

To make cream of chicken, omit mushrooms, substitute half the milk with chicken broth or stock.

To make cream of celery, substitute celery for the mushrooms and proceed as listed above.
Yield: equals 2 10 oz cans

So this recipe makes twice as much as you need if you are substituting for one can of condensed soup.

Note: If you want to use this in a crockpot recipe I would suggest using only cream, not milk, as milk tends to separate during long cooking.

Saturday, April 10, 2010

Special Brownies

½ cup butter
1 cup rapadura
2 eggs
1 tsp vanilla extract
1/3 cup unsweetened cocoa powder
½ cup whole wheat flour
¼ tsp salt
1 tsp baking powder

Preheat oven to 350 degrees. Grease and flour an 8-inch square pan. Melt the butter. Combine all ingredients with a mixer and spread into the prepared pan. Bake for 25-30 minutes. Do not overcook. Top with homemade ice cream!

Coconut Oil Cookies

2 c. whole wheat pastry flour (Azure)
1 tsp. Baking soda (aluminum free)
½ tsp. Celtic sea salt
¾ cup brown sugar or (½ cup brown sugar and ¼ cup rapadura)
1 cup virgin coconut oil, melted and cooled slightly
2 eggs
1 tsp pure almond extract
1 cup quick oats
½ cup rolled oats
Chocolate Chips

In bowl, combine sugars, eggs, oil and extract. Mix well. Blend flour, soda and salt. Add flour mix to sugar mix. Stir well. Fold in oats and chocolate chips. Drop on greased stainless steel cookie sheet. Bake @ 325 for 8-10 minutes.

This is not a sugar free recipe. You can play with reducing the sugar amounts or subsitiuting other sweeteners. I have used this recipe and it goes over well with my husband who demands some real sugar!! At least its whole wheat and it gets him and the kids some healthy coconut oil.

Fluffy Whole Wheat Pancakes

2 cup white whole wheat flour
1 tsp. Baking soda
2 tsp. Baking powder
1/2 tsp. Salt
2 eggs, beaten
1 ¾ cup milk
1/4 c. olive oil
¼ cup vinegar

Add ingredients in order given. Don’t beat too much. Optional: beat egg whites separately and add the whites last.

The vinegar seems like a strange ingredient but you cannot taste it in the pancakes. It reacts with the baking soda to make a very fluffy pancake. Give them a try and let me know what you think.

BTW: If you have never cooked pancakes use a medium low heat and drop the batter in the pan or on the griddle. Let dough spread out, then wait til the surface gets a little dull and bubbles rise up. Its time to flip then. Don't wait too long or they loose their fluffiness and get stiff.

Coconut Flaxseed Pancakes

1 ¼ cup white whole wheat pastry flour
2 tsp. Baking powder
¼ tsp. Salt
1 Tbsp. flaxseeds, freshly ground (optional)
1 egg, beaten
1 cup milk
2 Tbsp. Coconut oil, melted


Combine dry ingredients. Beat egg in 2 cup measuring cup, add milk to measure 1 ¼ cup. Add melted coconut oil to egg mixture while whisking. Add egg mixture to dry ingredients and blend.

You can subsitute any flour I would think and you could use olive oil instead of coconut oil.

Curry Salad Dressing

3 Tbsp. olive oil
1 Tbsp white vinegar
½ tsp garlic salt
¾ tsp. Curry powder
1 tsp. Prepared mustard
1 tsp. Lemon juice
(Maple syrup or stevia to sweeten if necessary)

Use a canning jar with lid to keep it in so you can shake it. I would not refrigerate it because the olive oil will solidify. If you do you need to remember to take it out of the fridge half hour before using.

Almost all store dressings have sugar or high fructose corn syrup in them and we are used to the sweet taste. If you need to just sweeten your with a little stevia or a few drops of Maple Syrup to wean yourself off the sweet taste.

Friday, April 9, 2010

100% Whole Wheat Bread Recipe

This recipe is adapted from the www.urbanhomemaker.com site. I am not happy about using the dough enhancer, but without it it does not rise nearly as well. I will update this listing when I figure out how to improve it.

Bread Machine:

1 1/2 cups warm water
1 Tbsp honey
2 Tbps. coconut oil
3 1/2 cups white whole wheat flour
1 1/2 tsp sea salt
2 tsp. dough enhancer
3 Tbsp. vital gluten
1 1/2 tsp. SAF instant yeast

1. Pour water into bread machine. Add the honey and coconut oil ( I don't melt the oil, it just melts when I add it to the warm water.)

2. Mix flour, salt, dough enhancer and gluten in a bowl. Add gently on top of water in the machine. Make a dent in the flour for the yeast.

3. Add yeast and start machine.

Whole Wheat Tortilla recipe

3 cups hard white whole wheat flour
1 cup water
1/4 tsp. baking powder
1 tsp. salt
1/4 cup Extra virgin olive oil

1. Combine flour, water, baking powder and salt in mixer. Stir and slowly add oil.
2. Knead together by hand.
3. Let rest 10 minutes.
4. Divide into 10 balls.
5. Roll each ball out on greased surface until very thin. Pick it up once or twice to get it even thinner.
6. Heat on dry cast iron griddle.